BEFORE/AFTER: Hard Light, and Overwhelming Tones
Ever since the middle of high school, I’ve been immensely interested in “the process.” You know, that middle bit between point A and point B that nobody but the artist ever sees. I’ve always loved peeking behind the scenes to see where something started and what kind of work and thought went into creating the finished product. To satisfy those of you who are like me, here’s another post in my Before/After series which not only shows you my images straight out of camera and the final product (hover over the image to see the before), but which uses each image to explain a bit more about what I do in post. If you’re just here for the freebies, enjoy the article! If you want to dig in way further, I cover every step of my post processing in my Editing + Consistency class. Enjoy, friends!
BLEU | HARD LIGHT
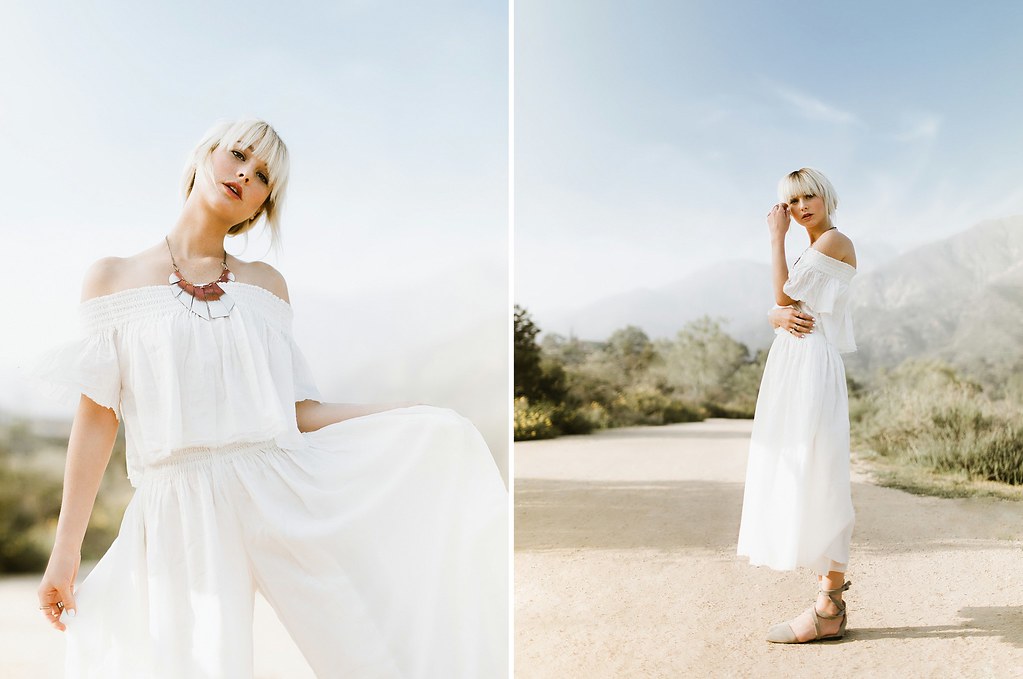
5D III + 35L
Hard light is a whole different beast. It’s a monster with hard shadows, distracting backgrounds, and strong colors. Luckily, we can calm that beast down. And for the record, I know. This isn’t “Hard Light” but it’s modified hard light ( I had a diffuser blocking the sun from her top half) and the background is in hard light. Sheesh.
If you know my work, you know how much I love soft light. You know I search for shade and you know that back light gets me giddy. Well guess what friends… experimentation fosters progression and lately I’ve been experimenting in harder light!
LIGHT / EXPOSURE
Let’s start with what we should always focus on first, the light. The type of light you work with is one of the most influential factors on your editing. Editing for hard light and soft light is a completely different ball game. My typical images have soft light on both the subjects and the backgrounds. That’s very important to my style since my tends to have a softer (although still contrasty) feel. In the images above, I wanted to keep that softness in my subject while playing with harder light in the background. My setup was simple. The sun was coming through a small circular diffuser on her right (your left) which shaded the top half of her body. Other than that, I let the hard light takeover.
Exposing shots like this is the same as I’d expose anything else. I underexpose the brightest thing I want to keep detail in. Did you follow that? In this shot, I wanted to keep detail in the sky and the skin (I wanted to keep some blue sky) and since the sky was brighter, I underexposed that. That left the skin much darker, but that’s okay because we can bring that up in post without losing details. On the other hand, if I exposed for the skin, I would have kept details there but would have blown out the sky. When shooting digital, if you blow something out, it’s gone forever. It’s always best to err on the side of underexposure (unless you’re shooting film).
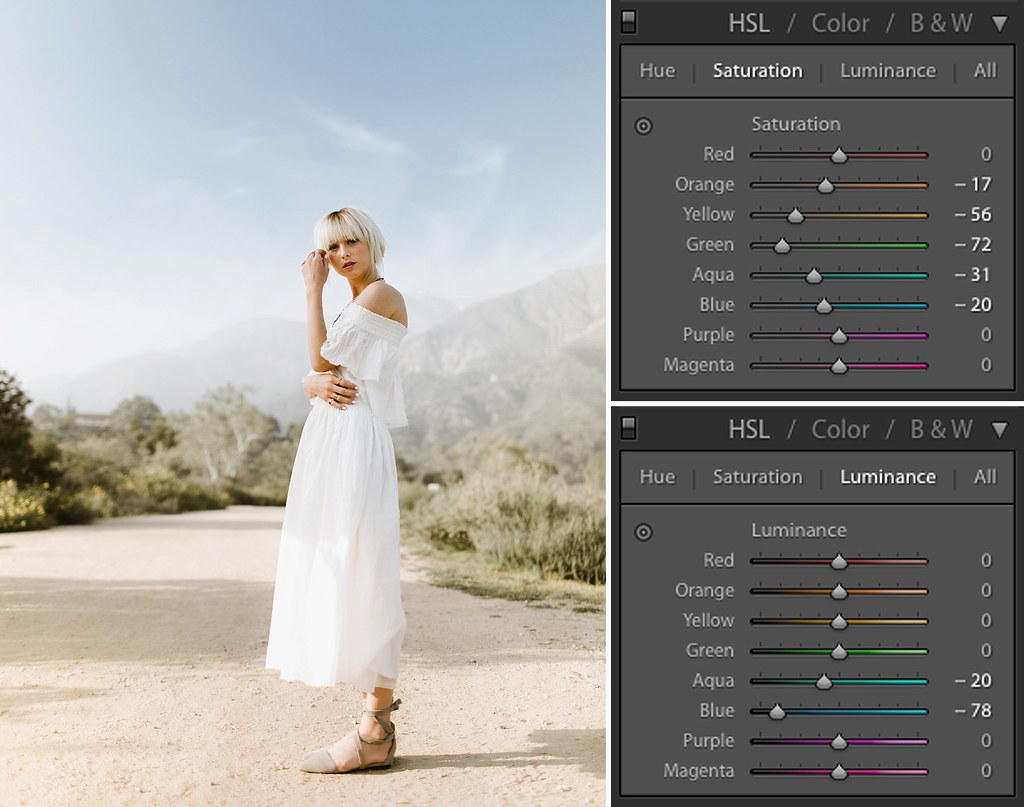
TONES
Tones! Woohoo! If you’ve shot in both, you may have already realized that one of the biggest differences in soft/hard light is saturation. If you look at a blade of grass in the shade, you’ll see a soft, peaceful green. Move it into the sun and it turns into a freaking neon blaze of green hell fire. Sun = Saturation. It’s just simple math.
Why does this matter? If I want to keep my images in hard and soft light consistent with each other, I have to understand how to manipulate that saturation. This is where the glorious HSL tool comes into play. If you don’t know where that is, it’s the super confusing looking patchwork of sliders under the Tone Curve in Lightroom. This panel allows you to manipulate three things about each specific color: the hue, saturation, and luminance. For example, I could change the blues in the image (make them a different color, add/kill saturation, or change the brightness of them) without affecting any other color in the frame. Pretty dang handy.
The HSL slider is something I’ve rarely dug into when I’m working on images with softer light but it can be crucial for taming the bonkers colors that hard light can give you. When shooting outdoors with hard light in the background, you’ll likely be seeing strong greens, yellows and oranges taking over your image. To subdue those colors a bit (bringing them closer to how they would look in soft light), you can simply drag down the saturation for each specific color you feel is too strong. So dang easy! The only other thing I did in the in the HSL for this image is to bring down the luminance on the blues/aquas to darken the sky just a tad. You can hover over the image below to can see the exact settings and the difference they made on the image. Yay!
Hot dang, that was a lot of technical mumbo jumbo. Here’s a stupid GIF of me to keep you entertained.

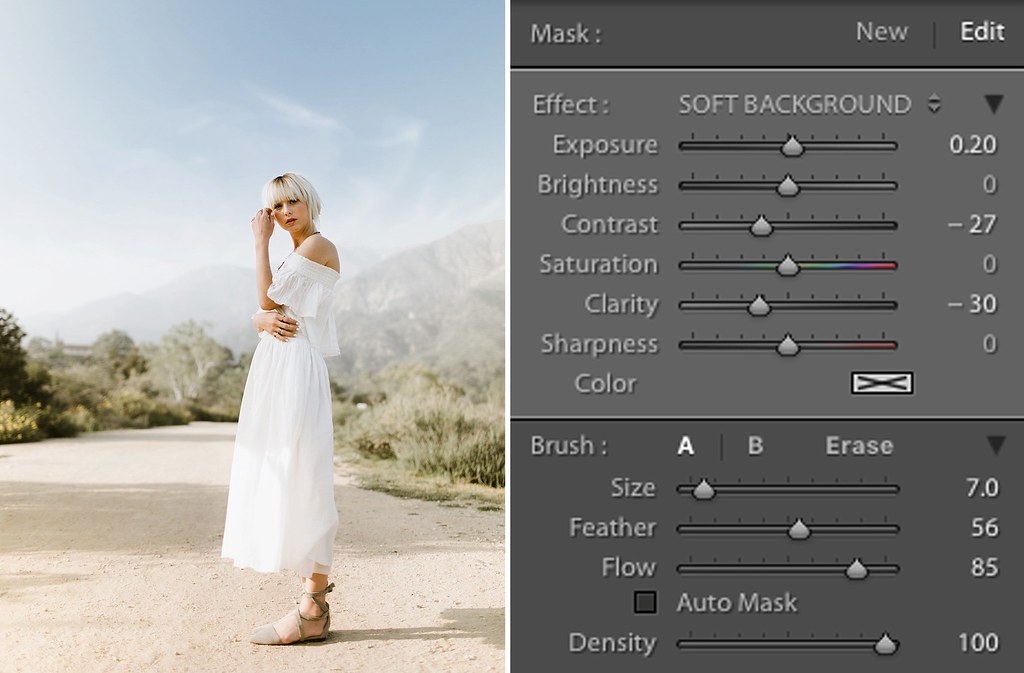
HARSH BACKGROUNDS
The main reason I shoot with soft light in my backgrounds as much as I do is because it helps me keep a muted tone in an image and it allows the subject to pop. Hard light in the background can have the opposite effect. The background can go from soft to harsh leaving you with a subject that doesn’t draw your eye and a background that feels abrasive and busy.
Good news, we have a fix! Wouldn’t it be weird if I posted one of these before/after blogs where I just talked about all of the problems but didn’t give any solutions. If I ever decide to annoy a ton of people at once, I’ll do that. (And for those of you wondering, that’s what we call a tangent). Lightroom has a killer tool right under the histogram called brushes. These allow you to paint over any part of the image and change almost anything about that part of the image. If I wanted to make her left arm bright orange and contrasty (you know, like on myspace), this is how I can make that happen.
In this case, I’ll use the brush to take the background from harsh to soft by painting on everything except for her and the sky, and lowering the contrast and clarity of that area. Bringing down the contrast subdues the difference in light/shadow and lowering the clarity takes the harshness out of the lines/shapes behind your subject. That creates a softer, more visually pleasing background and a subject that pops out of it. Bingo! You can see the exact brush settings and the difference it made by hovering over the image below.
Alright that’s enough of staring at that image, right? Thought so.
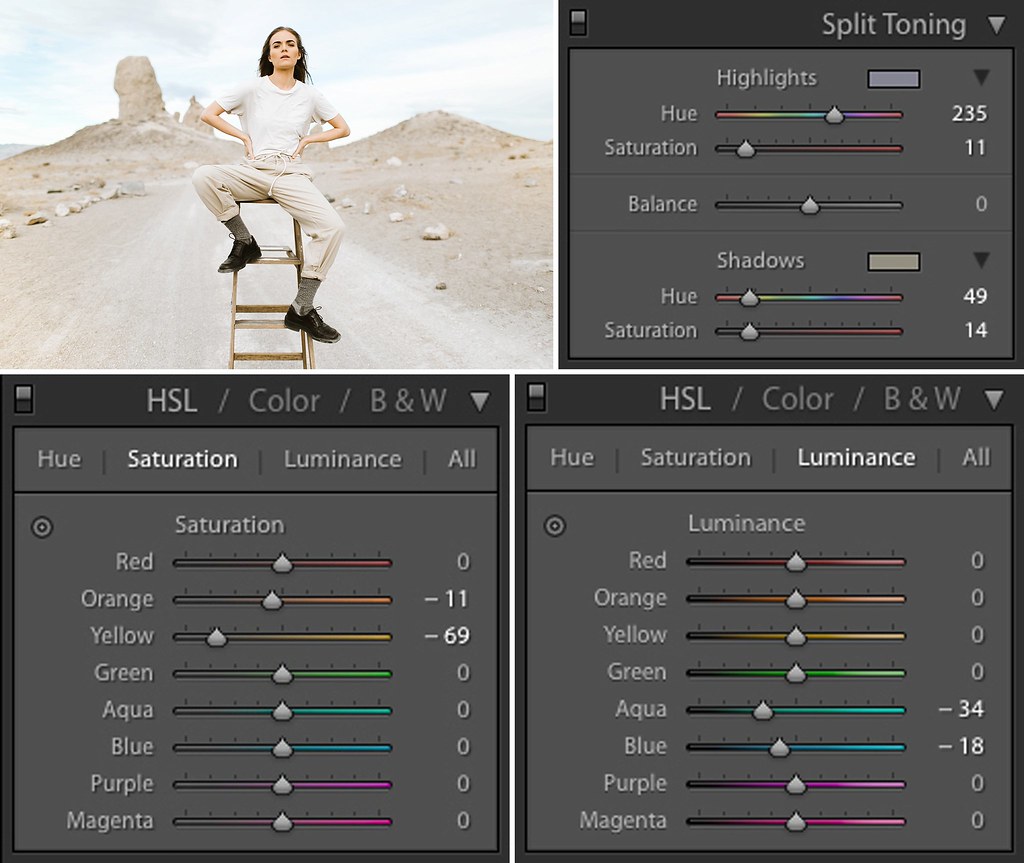
MEREDITH | OVERWHELMING TONES / SPLIT TONING
5D III + 35L
This shot of Meredith was from a shoot a few months ago that I was hoping would be a dive into playing with hard light. Instead, I showed up to our shoot spot to find nothing but cloud cover (sometimes nature has it’s own plans). I ended up shooting most of these front lit using the clouds as a diffuser. That allowed me to have soft, flattering light on Meredith and exposing it in a way that would keep a bit of color in the sky.
HSL SLIDERS
Shooting out in nature as much as I do (and jumping from landscape to landscape) can mean I’m always finding little quirks in the colors that I need to fix. When I shoot out in the desert, I find that the yellows and warmer tones can be overwhelming because the light is reflecting off the ground and spreading those warm tones all over the frame. When I shoot in the forest or anywhere with a ton of grass, I see the same thing happening with greens. Above, I said that I rarely come into the HSL sliders when I’m shooting in soft light and this is one of those rare instances. It’s a pretty simple process:
1. Figure out which color is overwhelming.
2. Desaturate that color.
3. Success.
You’ll see in the image below that I also brought down the luminance of the blues and aqua again to keep the color in the sky.
SPLIT TONING
Next up is my happy place, Split Toning. I love the power of this tool and I LOVE turning people on to it. Split Toning allows you to add a specific tint into the highlights and shadows individually. That means I can have blue shadows and yellow highlights (mimicking Kodak Portra), red shadows and blue highlights (mimicking expired film), or I can just create a palette unique to me. I typically prefer to use only yellow in the shadows and nothing in the highlights but lately I’ve been adding blue into the highlights as well for a slightly different look (check out the rest of the images from this set with yellow shadows and blue highlights here).
The difference that HSL and Split Toning can have is pretty drastic in terms of eliminating overwhelming colors and cleaning up your image. If you hover over the image below you can see the difference it makes and the exact settings I used.
YOU MADE IT!
Well, dang! That was much more technical than the other Before/After post’s but I wanted to share a slightly different side of things. I hope you found it helpful! Feel free to dig in to my other free education in my blog, my Editing + Consistency class (which covers everything I do in post and then some), or my other Self Paced Classes. Until next time, high-fives!
Also, I recently launched Heck Yeah Presets (SUPER EXCITED) for Lightroom and ACR! Kthanksbye.
Thanks, Ben, For SHARING your process. This is one of the best write-ups i’ve read recently and, even though i’ve been shooting for a while, i’ve learned some new techniques for handling light.
Thanks for that and Great gif 🙂
ben! we love yor work + anxiously await your new presets! xx
thanks a lot!
Ben, IT’S REALLY REFRESHING THAT YOU’RE SO OPEN ABOUT YOUR EDITING PROCESS! THANKS SO MUCH 🙂
As always – great post and sooo helpful! Thank you so much for this 🙂
Ok thx!
Just the kind of post ive been looking for! Thanj you for Sharing!!
Super awesome sharing!
Awesome article!
Hey Ben! We always enjoy your work and blogs as it inspires my wife and I. Definitely excited to see the presets!
i Would love to know when you launch your presets!
Love this post extra! It’s so refreshing when photographers assume their readers are smart and capable of understanding nuanced techniques. You are a gift to the photographer communtiy, Ben!
Please
aWESOME INFO. yOUR POSTS, TUTORIALS, AND PHOTOS ARE ALWAYS SO REFRESHING. tHANKS FOR SHARING!
**SO** HELPFUL. Thank you!
“… neon Blaze of green hell fire.”
Haha! Absolutey perfect descrIption!
Love your work! Cant wait for Your presets!
I think you’re a genius. Thank you thank you thank you for all your helpful advice!
Thanks! this was super helpful…
this was amazing! Thanks you!
Thanks so much for sharing this ben i was in need of some direction and understanding of how tools should be used in lightroom. Very helpful 🙂
Reading your blog always makes my day! Thank You so much for sharing and being such a big inspirtion for community over competition. Xx
Hell. Yes.
awesome thank you!
I get pretty bored reading blogs, so i normally don’t :/. But i always enjoy yours! Thanks for letting your personaliTy come thRough to make it super enjoyable as well as Informational. Huge fan 🙂
So great! Thabks for sharing!
So excited About this article! I am looking to make my harsh light photos look comsistent with the soft light photos as well. Im so exciyed to see the bew presets released soon too! Thanks for the tips!
Thanks, ben. that was extremely helpful to read. 😀
Yeaaghhh
This is so cool and so very helpful! Thank you 🙂
So good! Thanks!!!
Thanks so much!
Awesome sauce!
Such a great post and so informative! Thanks 🙂
Thanks so much of what you wrote in this article online .
awesome tips as always! )
Fantastic Resource, thanks ben!
really a good work here! 😉
I always enjoy reading your posts. Thank you for sharing your knowledge (and love) for photography!
This is great ! Thank you so much !
Thank you, that was really helpful!
You win the prize. all the prizes. the whole hover before/after with the image of the sliders right there next to it is amazing and so so helpful. thank you ben!
Ben, thanks and would love to get your cool presets!
Killer preset notofication
Thanks for sharing your process, I can never get enough Lightroom help! This one was especially easy to follow and I loved the clear before and after steps. I am looking forward to checking out more of your stuff!
Incredible stuff Ben! Thanks a bunch for sharing. If you ever are in need of a virtual coffee, we’ll shout.
THANKS BEN, AWESOME TIPS AS ALWAYS!!
Thank you for a practical and straight-forward blog post! I love learning from other photographer’s and getting a peak into your process. I’ll be a better photographer for having these little nuggets in the back of my brain 🙂 Thanks again!
This has been the best thing ever! I feel like every wedding i have shot this year has been harsh light and this is so refreshing and exciting to have this step by step!
This is so incredible helpful – thank you, thank you!
Amazing! Split toning!? Thank you! I have been trying to fIgure This out for some time. Its perfect. I use the sliders all the time but this just gives me that extra awesomeness i needed to get me in the right direction. ThaNks Ben!
Ben! thanks so much for this wonderful write up! i have been shooting for a while and am just moving from photoshop to lightroom for processing. the detail you have included has helped me debug several issues i was having! REFRESHING to see the EXPLANATIONS for what each task does! tahnks for sharing!
Love your work…i’m making a new website so it’s old work if you look. i’m still struggling to find my editing style…i feel like i change my mind all of the time. ha!
Thanks ben! Very helpfull.. But I want to ask, did you use f 1.4 / 2.8 on that photo? Thanks for your help.
Yohanes, It was shot at 1.8, on the 35L 1.4.
This is ss incredibly helpful! I feel the same way about seeing how things get from A to B – and this makes it so much more approachable for me! Thanks again for giving us a peak behind the scenes!
Amazing!!! I love love love this.
we want more 🙂 love your pictures and retouching style, thanks for sharing simple but yet usefull tips 😉
Awesome walkthrough. Beautiful images – love your photo and editing style. Also, really appreciate your conversational writing style. Thanks for the blog post.
You can not imagine how much i have searched for a tutorial like this. thank you so much for sharing your knowledge!
WOW LOVE your WORK.
Inspirational, THANKS FOR SHARING!
i loove your style, how all your images make sense with one another! thanks for this, it wasn’t too technical, it was great! keep it up you are amazing!
Hi Ben. What GRABBED ME MOST ABOUT THE IMAGES WAS HOW WELL YOU GOT RID OF THE HARSH CONTRAST IN THE MODEL HERSELF. aNY TIPS ON HOW YOU DID THAT? aNY TIME i TRY THIS MYSELF I’M UNDERWHELMED BY HOW WELL IT TURNS OUT. cHEERS!
Bernie, Thanks! That came from a mix of having a flatter tone curve with the highlights brought down, and bringing up the fill light a bit.
Smashing stuff Ben. DON’T shy away from overly TECHNICAL bits and pieces, some of us lap it up wanting more.
Love your way of communicating your process, fun and helpful.
Keep up the work man!!
Such a great post..Thank you for sharing! I was just going to ask you about making your own presets 😉 cant wait to see them.
Ben, you rock. That is all.
hi there! i am new to all this and i can’t seem to understand the first part of the process. how does that work with all the underexposing and stuff? is it the brush and you just played with the exposure button, and you used in some areas to overexpose and in others you did the opposite? the second part is easier since you put the pictures but here i am having troubles and is is the most important part.thanks
Hey Luiza! The underexposure is done in camera.If you don’t know already, I’d suggest learning how to use your camera’s meter to expose your image properly (google can probably help you learn this). Once you understand that, you’ll be able to decide to expose it properly, or underexpose (I underexpose).
want to know when you have new presets!
I understand that,because from what I read you do that a lot. But i am not sure, did you make some modifications in lr before working on the tones?because the before picture from the tones subtitle already looks bright, so i am thinking you already did something and i don’t know what. ,many thanks
Luiza, In that image, I had done all of my other edits aside from the tones so I could illustrate the difference the HSL made. I had already added exposure, contrast, etc to the image.
well this was crazy helpful!! Your editing class is totally on my wish list but posts like this are so amazing for right now!
Interesting as usual
Really nice Ben, thank you for sharing with us.
Really interesting, thanks ben!
hi Ben, thank you so much for posting this, it helped me a great deal! really appreciate it, as not many photographers share.
This is the best post on editing i’ve ever came across. Thank you so much! 🙂
OMG I just had a lightbulb moment after reading this post! Thank you señor Sasso for this great blog post – – I love following your work!
Muchas Gracias from Pura Vida Land AKA Costa RIca!
discovered your site and insta maybe 17 mins ago and already hooked. your writing is so refreshing and i am officially obsessed with your work!!! thank you for being so honest about your editing style too, it is so refreshing to have a photographer care about helping others! three cheers for ben and an extra for that gif!
These are gorgeous! This is such a great post! Thank you for sharing. 🙂
Thank you sooooo much!!!!
Mind bending, but awesome stuff! Thanks mate.
Thx for your job!! Great post! 😀
I would like to be notified when you release your presets. Thanks!
Charis, hi! You can sign up for my email list on the Connect page if you’d like :).
Sign me up for the email buddy, god damn that was easy to follow and all presented in a very palatable lovely website.
i think you’ll see by my website that i need to start killing a few harsh killer distracting colours in my photos
This was fantastic, truly appreciate your openness. As soon as the next paycheck comes through editing+Consistency is going in the shopping cart.
Amazing post, thanks so much for explaining all these things in detail!
hey ben! i’ve been UTILIZING split toning e lately and loving it. one question on skin though – in that picture of meredith, you desaturated the yellow to chill out the rocks, but how is her skin not affected?
Hi Hanna! The skin isn’t affect as much because the main tone in her skin is orange, not yellow.
This is just amazing, thank you so much fOr this post and for sharing tHis insight into your work. Your photos are beyond beAutiful! Looking Forward to being able to attend one of your workshops one day!
Thank you for sharing your knowledge with us!
Wow! this worked Wonders! I hope you hold an inperson class soon!!
Ben! Thank you for sharing your knowledge with us in great detail. You’re pretty darn awesome! 🙂
wow. this is an eye opener. i keep coming back to this post to get inspired on what i can do with a proper image in post.
Thank you! This was incredibly helpful + refreshing how you are so open about the editing process. appreciate your willingness to let others into the process (for free!). keep it up!
Thanks so much for sharing Ben, you’re a legend! Love your work!
This was so great! I’ve intended to read up on this article for a few weeks now and I’m glad I finally had time to get through it. Thanks for the helpful tips, as editing hard light has always been my main struggle. Looking forward to reading more of your posts!
Wow, that was su h handy information, thank you so much for being so open and sharing it with us all 🙂 Hugs from New Zealand
Thanks so much for all this info!!!! You are a rockstar!
This is solid. Thank you For always being so transaparent and sharing with the community!
This is solid. Thanks For always being so transaparent and sharing with the community!
What a refreshing approach to being an inspiring photographer!!! No tangents… .just real encouragement & answers!! ! Youre the real deal & my favorite.
This is great!
Thanks a lot!
You’re a legend mate… Bloody loved your self paced classes – but you already know that…
and…
Love all this extra info you keep on giving us. You are rad.
Great post. I love the clean soft look of your images. 🙂
Dude, so inspiring. I’m so gratful for you and your willingness to share your awesomeness.
Thanks so much for sharing this! It’s an awesome little tutorial and so helpful! You totally made split toning less of a monster for me to actual understand!!
Thanks for sharing and a great attitude 😉 !
Chris
This was so so incredibly helpful! Thank you for showing your creative process in editing!
no sky on these photos, before i can see sky and after not? this same with white dress, i dont see it only “big white hole”
no chance to work with fashion magazines
also why spend some much time in lightroom when we can use vscom, one click and pic are ready. your tutorial is waste of time and life 🙂 but you do good photos 😉 so + for that .
Hey Justin! To each his own 🙂
So helpful! Way better than any tutorial I’ve seen out there. Transparent, and to the point but also fun!
Thank you SO much, Ben!! Your editing style is my absolute favorite, and I’m always trying to replicate parts of it. I so so appreciate that you are so willing to share your creative processes <3
Great read. Thanks Ben 🙂
Thank you so much for all the information you provide for us! You are truley an amazing artist!
THANKS BEN! these classes are so helpful. ive been feeling real down and in a rut and these inspire me to experiment and try new ideas. so grateful!
Awesome post Ben, i’ve known what the HsL sliders have done for a fair while, never thought of using them like in the examples! Cracking work!
Hey, thanks for the post! Question i’m in lightroom but i can’t find the soft background option?
Hey Casey! It’s not a default brush. You’ll have to create it yourself.
Thank you for your turtoruals. One Day i will Photograph like you. You are a great example of What a nice photography Should be. Keep on doing what your are doing ! Thank you !
Thanks! This was really useful! is always nice not to see only before/after pictures but also the way you get to them, thanks again!
Great post, Ben! Thanks so much for sharing! May I ask what you used for a diffuser? Thank you! 🙂
You’re welcome! Just a 5 in one circular diffuser for this one.
I literally lol’ed at your explAnation of the Grass in hard light!!
I learned so much from this one blogpost, I wish more photographers shared their processes! I’ve messed around a little bit with HSL & Split toning, but the way you explained it & the before/after showed me how & what to do to achieve a totally different look!! so thank you!!
bEN, LOVE YOUR PRESETS AND YOUR WORK! tHIS TUTORIAL WAS SO HELPFUL TO ME AND YOUR HUMOR CRACKS ME THE HELL UP!
andihavebeenlookingforsomethingtohelpmeonthissubject,thisWHOletime!! aaah at last i can breathe. thanks ben for your post – super super helpful.
Hi, love your website. What meter would you recommend to use with the contax 645?
Thanks Chao! I love the Pentax Digital Spot Meter (it’s based on a zone system, not like the sekonic meters.
As someone who hasn’t taken a retouching class in over a decade, your quick (albeit, technical) post here was an awesome read. Even though I edit images every day, I think it’s great to read up on the post processing of other talented photographers. So thank you! And keep up the great work!
Do you have an assistant help you with your diffuser? If not, how do you manage by yourself?
Tristan, I did for this one!
I will have to recommend you to my friends. I am very thankful to you for giving this post.
thank you for sharing!
I ABSOLUTELY LOVE PROCESS! THANK YOU SO MUCH FOR SHARING YOURS.
Oh this was sooo helpful. THank you. Most tutorials out there give such minimal advice and just waste time. BOnus points for being funny too!
Thank you for sharing your process! so helpful for a beginner like me!
a good article for learning photography
You’re a good dude, ben. Thanks for being so entertaining, educative, Inspiring and genuine. it’s great to have someone like you ’round the old interwebs.
HUGE fan of your work! thanks for always be so transparent. love your philosophy, your humor and your insanely beautiful work!
So well written and such helpful information!!!! Thank you!!!
Hi Ben, could you please share with us the EDIT YOU MADE AT THE VERY BEGINNING (EXPOSURE, Highlights, Shadows, WHITES AND BLACKS)? Thank you 🙂
Thanks for sharing this! I’ve totally struggled with hard light / mixed shade many times, and i’ve found the HSL sliders to be really tricky.
I look forward to trying your approach 🙂
Great, thank you
Wow, that was interesting. Thanks so much for sharing, I learned something new today thanks to you. 🙂
oh my gosh!!!!!! That was amazing and so helpful!! thank you so much for sharing your talents